
If there is one thing we can all be sure of over the course of our lifetime, it's the fact that we will face many challenges along the way. While there are several different ways one may approach a challenge, my philosophy has always been that failure is never an option and we must rise to the occasion to meet and overcome anything life may throw our way... No matter how big or small!
It's no different in the life of a sailboat... Especially my sailboat who has undoubtedly faced many challenges during her 44 years of existence. When I first found her she didn't seem as though she would ever be able to face another challenge, let alone overcome one. While she almost had me convinced at one point that this was true, I must admit that with every passing day I am feeling more confident that she will soon be able to meet perhaps one of the biggest challenges that an old discarded sailboat will ever have to face... The challenge of floating again!
That's right I said floating again... Now, I know you may be thinking where's the challenge in that? After all It is a boat and boats are designed to float right? Well, yes but they are also destined to sink if they are subjected to conditions that are not within the scope of their design.
I picked up the following statistic on the BoatU.S. website which is a great resource for all boaters; power or sail.

As you can see in the pie chart above, sinking due to an improperly maintained vessel makes up for approximately 2/3 of the chart. If you've only read just a few of my previous posts you already know that I acquired the boat in a serious state of disrepair. Even though I am making a very conscious effort to restore her integrity I can't lose sight of the fact that this is a "first time" restoration and I may have missed something along the way. No matter, I will either be thinking about everything I did right while I'm sailing home or everything I did wrong while I'm swimming home.
On that thought, I have intuitively come to realize that it would be in my best interest to spare no effort in helping my little boat meet this challenge. Particularly because I will be the one that she is keeping afloat. This prompted me to learn about the dynamics of buoyancy (flotation) and in doing so I gained a little bit of knowledge as to the dynamics of sinking.
Many people will associate the words 'boat' and 'sinking' with the words 'Titanic' and 'iceberg'. This is understandable since the tragedy of the Titanic had such a gripping effect on society's psyche. Now, even though my chances of hitting an iceberg here in coastal Florida are pretty low, there are still plenty of other circumstances that could lead to sinking.
Swamping is always a big concern especially on a sailboat. The nautical definition of swamping is simply described as when a boat fills with water and we all know what happens then...
There are several ways a boat could fill with water while underway, even if it doesn't have any holes in it and everything is in proper working order. Waves for example have the potential to come over the sides and swamp the boat. When it comes to a sailboat the wind can play a role in swamping your boat too.
Sailboats are subject to heeling, meaning they often travel at an angle relative to the wind pushing on the sails. You may remember that we discussed this concept in our post "Carina", noting the importance of the keel which provides the counterbalance that is necessary to keep the boat in an upright position.

Even with the keel functioning properly, a strong gust of wind, an unexpected wave, or both together have the potential to knock a sailboat down long enough to take on large amounts of water. That's why many sailboats -especially the smaller ones- are designed with additional flotation. My boat was designed with additional flotation but it was no longer there.
In the early days when a ship broke up at sea, sailors clung to anything that floated and waited tirelessly for help to show up and save them. Today things are slightly different. Whilst sailors are still waiting for help to arrive, hopefully they are doing so from the safety of a partially submerged vessel that did not actually sink. This is made possible by positive flotation..
There are many different ways of introducing positive flotation to a boat. Some of the more conventional methods are the addition of foam blocks, sheets or expanding foams.
Then there are some unconventional methods... I've actually heard of people using Ping-Pong balls, soda bottles and -believe it or not- Pool Noodles!

This is just one of the many actual restoration photos I came across while researching foam flotation on the Internet. I was very surprised to find that pool noodles are becoming such a popular alternative to engineered flotation methods.
Although I won't comment as to whether this is correct or incorrect, I will state that this is not an option I would choose. Marine foam products are very expensive and I can understand why someone would look for economic alternatives but it basically comes down to the safety of you and your passengers and what that's really worth? As for me, I chose to spend the extra money but hey, whatever floats your boat right? Pun intended....
I decided to go with the pour in place polyurethane expanding foam for two reasons. One, it was available in several different densities (which we'll discuss later) and two, it looked like it was going to be a lot of fun to apply!
The foam comes in a two part liquid usually labeled "A" and "B" and once the two parts are combined you essentially have 25 to 45 seconds to thoroughly mix and apply it before your mixing cup ends up looking like the last frame in the photo below...

Fun right? Absolutely, if you like working under pressure in a hot confined space with lots of safety gear on... Yes in that case I would have to say it's a blast!
Now before you run out and buy a few gallons of expanding foam there are several key points you have to remember. We'll start with safety. Safety is of the utmost importance when working with chemicals so follow the manufacturers cautions always! At a minimum, a respirator, protective gloves and eye protection are a must...
The next thing you want to keep in mind is that they call it expanding foam for a reason. You should always have overflow holes in place because if you don't the expanding foam could potentially deform your hull or even break through during the expansion process... Take another peek at the mixing cup in the photo and try to imagine what would happen if it was capped!
Once you've built up enough confidence to where you think you can safely work with this stuff without blowing your boat apart you will want to know a little bit more about how buoyancy actually works. A fundamental understanding is very important when it comes to picking the right foam for the right application as there are many different types available but they are not all used for the same purpose.
Archimedes of Syracuse, the Ancient Greek mathematician is credited with discovering the physical law of buoyancy otherwise known as Archimedes' Principle.
While it's really difficult to prove historically how or when Archimedes made this discovery, legend says that Archimedes was summoned by the King to determine whether or not the royal crown was made from solid gold or a cheaper mixture of silver and gold. Apparently, the King was suspicious of the royal goldsmith but did not want to accuse him without having proof.
The King was confident that Archimedes -known for being one of the smartest men in the Kingdom- would rise to the occasion and be able to determine the goldsmith's guilt or innocence.
Archimedes on the other hand, actually had no clue as to how he was going to figure this out so he decided to think about it over a long relaxing bath. When he settled into his bath he observed that the more he lowered himself into the tub the higher the water level would rise. As the water spilled over the edge Archimedes concluded that "any object, wholly or partially immersed in a fluid, is buoyed up by a force equal to the weight of the fluid displaced by the object."
So this is how he figured out the King's crown problem. He knew that gold was heavier than silver, so a piece of gold and a piece of silver of the exact same weight would have to be a different size since you need more silver to match the weight of gold. That said, a crown of pure gold would actually be smaller in size than a crown mixed with silver and ultimately displace less water! The goldsmith was guilty!
Confused yet? So was I at first but after a long relaxing bath of my own I realized that it was really pretty simple. There are basically three key components when it comes to understanding the principle of buoyancy so this should actually be as easy as 1,2,3...
Mass, Density, and Volume.

Mass is simply described as the amount of matter in an object. Matter is pretty much anything that takes up space such as a boat, the water in the ocean, or even a cloud in the sky. All matter is made up of tiny particles known as atoms which vary in quantity and size across different types of matter.

Volume is the amount of space that matter takes up so if we wanted to know how much volume is in the cube below we would multiply it's length x width x height.
If each of the measurements were 1 foot you would have a volume of 1 cubic foot.
Example: 1' x 1' x 1' = 1 ft3

Density is defined as an objects mass per unit volume. An easy way to think about this is to imagine how atoms are assembled in an object and how much space they take up. If the atoms are closely packed together the object would be considered dense and occupy less space than an object which has its atoms spread further apart. Think of the old riddle, "Which weighs more, a pound of bricks or a pound of feathers?" The answer is they both weigh the same but feathers take up a lot more space.

Density is important when it comes to buoyancy because it is the determining factor in whether an object sinks or floats. Simply put, if an object is more dense than water it will sink and if it is less dense than water it will float. A really cool experiment that shows this concept is seen in the following picture.

Both cans are of equal volume but their densities are different. The volume of the regular Coke can is concentrated with 39 grams of sugar making it more dense than the volume of water it's displacing so the upward force of buoyancy is not enough to hold it up. The Diet Coke can on the other hand, does not contain any sugar and is less dense than the volume of water it's displacing so therefore the upward force of buoyancy allows it to float.
This is what makes it possible for big steel ships to float. We know that steel is more dense than water and would normally sink when placed in water but when it comes to a large ship you have to consider the total volume of the vessel is filled with air which is much less dense than water so if there is enough air in the ship to make the total volume (steel and air) lighter than the amount of water it displaces, it will float just like the Diet Coke can in the photo above. Conversely, a hole in the ship that allows water to enter and displace the air would change the density of the overall volume and the ship would sink, just like the regular Coke can.

So once I got to this point in the project where I felt like I knew a good bit about buoyancy I was ready to purchase flotation foam. The way they sell this stuff can be pretty confusing but the research I did was a great help in selecting the correct foam as well as the correct quantities.
Polyurethane expanding foam is a closed cell foam meaning it is impervious to water, fuels, and other chemicals that could potentially break it down over a period of time. It is self adhering and will bond to almost any surface it's applied to. This is important because if you did tear a hole in the bottom of your hull you don't want to worry about your flotation floating away... Sounds funny right, but think about the ping pong balls or pool noodles.
The foam is sold as a two part liquid in quart or gallon quantities but it also has a pound designation. This is where it could get a bit confusing but now that we know all about the laws of buoyancy it should be easy to understand.
If you only want to add flotation to your boat you would buy 2 lb. foam. This is the lowest density rating which means it has the highest flotation capability. Think of it as the Diet Coke can-less dense more flotation. The pound designation simply means that one cubic foot of foam weighs 2 lbs., hence it's pretty light. 1 cubic foot of 2 lb. foam will also provide approximately 60 lbs. of buoyancy (1 cubic foot of water weighs approximately 62.4 lbs.). So once you know how much water your boat displaces you can start to calculate how much foam you actually need. My boat for example displaces 1200 lbs. of water, does that mean I need 1200 lbs. of flotation? Not necessarily...This is because not everything on the boat will cause it to sink. For example, the wood or cushions are going to be less dense than water so they will have a certain amount of buoyancy. On the other hand items like the mast and boom are more dense than water so they will not have any buoyancy and increase the boats chances of sinking. This is why understanding density is important when it comes to figuring out how to keep your boat from sinking. The following link is to the 'US Coast Guard Boat Builders Handbook' which is chock full of great information on this topic and even provides the densities and calculations for items that should be considered when determining your boats flotation needs.
https://www.uscgboating.org/regulations/assets/builders-handbook/FLOTATION.pdf
There is one other thing to consider before opening your wallet and buying a few gallons of 2 lb. polyurethane flotation foam. They make it in higher densities! The higher density foams are heavier per cubic foot, provide less than 60 lbs. of buoyancy but are extremely strong and the higher densities are actually used for structural repairs.
Knowing the age of my boat and the condition in which I found her, I knew that I would definitely want to use the structural foam as it still provided some flotation-just not as much as the lower density foam. In the end I went with both and decided to use the 2 lb. flotation foam (60 lbs. of buoyancy per cubic foot) in the stronger areas and 16 lb. structural foam (45 lbs. of buoyancy) in the weaker areas that underwent extensive repair.
When using the higher density 16 lb. foam you lose 15 lbs. of buoyancy per cubic foot (45 lbs. v. 60 lbs. of buoyancy) but from a structural stand point you gain a significant amount of strength.

Ok so now I think I'm ready to pour some foam! If you remember in our last post we fiberglassed all of the stringers and bulkheads in place. These are the areas I plan to fill with foam and cover with wood to create a bench seat and a v-berth.
The original manufacturer used flotation foam billets under the cockpit deck and in the forward portion of the v-berth.

The foam blocks have long since disappeared, for all I know they may have floated away. Not a problem because I had a different plan in place!

The dark blue shade is where the 16 lb. structural foam would be poured, the light blue shade is where the 2 lb. floatation foam would be poured and the grey area is storage. This not only matched the design of the original manufacturers but it adds additional flotation and strength! (forgive the cheesy graphic, my picture editing app sucks)
Mixing time!
The mix ratios are very important so you will want to ensure that you follow the manufacturers instructions and measure accordingly! Take all the preparation time you need and try to have everything in place beforehand. Once part A and part B are combined you have approximately 25-45 seconds to thoroughly mix and pour!

Start out by mixing small amounts first so you get a feel for how much it will expand.

Once part B is added the clock starts!

After about 15 seconds of mixing the cup begins to heat up, the color changes and the foam starts to expand....

NOW! Throw it!! Ahem... I mean pour it....

Wait for it...

Wait for it......

There we go!!
OK, once the foam started to resemble a thanksgiving turkey I was certain that the lower portion of the cavity had the proper coverage. I did one more pour to bring the foam to just about an inch from the top of the cavity. Once it was set I fiberglassed the wood covering in place and poured the rest of the foam through pre-drilled holes. Some people prefer to pour their foam after all of the wooden structure is already fiberglassed in. This is ok too but you have to be sure the foam doesn't start to set before it covers the length it has to travel. That can be difficult to estimate so I decided to do it in stages to ensure uniform coverage which is especially important when pouring the structural foam.
The coverage length on the port and starboard side were 6' and 8' which is a pretty long distance for fast setting foam to travel before it begins to set.


This was close enough to the top to where I could install the wood cover.
To minimize working time in such confined spaces I fiberglassed the wood covers outside of the boat.


Doing this saved a tremendous amount of time and aggravation! I would still have to fiberglass the wood into the confined spaces but it required a lot less effort.
Another benefit to working this portion outside of the boat is that assistance was readily available!

Slacker!

While my first mate Daisy continued working hard in the garage, I moved back to the inside of the boat to finish the job!

When you drill the holes (pour and escape) remember to save the round cut-outs. Once the foam starts to near the top of the hole you want to use the round cut-out to keep the foam inside so it can travel to the next fill (or escape) hole.
I watched a few videos of this process beforehand and noticed that one of the issues they had were that the cutouts kept falling through the hole into the wet foam before it set. A pretty good solution to this problem is using tape and ice cream sticks.
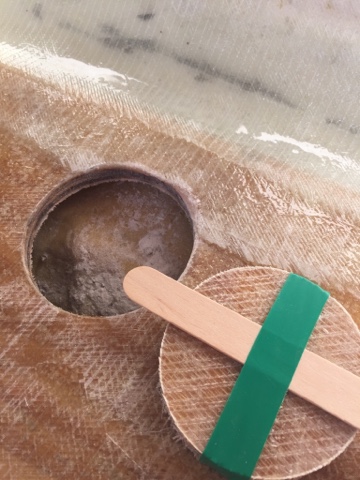
When you pour the foam in the hole watch as it rises...

Once the foam starts nearing the top of the hole.... Place your cut-out over the hole.

Have a few bricks or weights handy to hold the cut-out in place...


After you are sure that the brick will hold the cut-out in place you can move forward to the next critical step in the process...

In the end, I won't say that this was one of the harder jobs of the restoration but it certainly wasn't the easiest either. It required quite a bit of research and critical thinking up front because I had absolutely no real experience with this process.
I'm glad I took the time to do the research though because not only did I avoid potential pitfalls like deforming or breaking through the hull, I also gained a fundamental knowledge of what it would take to help my little boat float once more.
So just like Archimedes, it doesn't matter what kind of obstacles you are faced with in life... Take a long relaxing bath, think about it and rise to the occasion to conquer any challenges that come your way!
See you next time...
The Curious Sailor


