With the boat sitting up on blocks it's now time to discuss removing and repairing the keel. As I explained in the last post, this would be quite the task because of it's location on the underside of the boat and the fact that it is very heavy and difficult to manipulate. Wait a second... do I detect a bit of confusion right now? Have you read this far and asked yourself, "Why did he title this post Carina?"
Are you answering your own question with-"Hmm... I bet the Curious Sailor is at it again. He's hitting the bottle instead of fixing his sailboat..." ?
If this is your thought process, you are incorrect my friend. Well, partially incorrect. I am sipping on some Pinot Grigio as I write this -so you got me there- but don't replace the word "Curious" with "Drunken" just yet...
In the post titled -The language of Sailing- you may remember that I wrote the following:
"In my mind, words are very much like sailors. They travel from one language to the next and anchor for awhile before they move on to a new language."
Well, the word "Carina" just so happens to be one of those words.
Most of us associate Carina with the female name. It has tons of variations across a myriad of languages but for me -having been born to Italian parents- I always understood the translation as a derivative of 'Cara' meaning dear or beloved. You remember the Adam's family right? Gomez was always calling Morticia 'Cara Mia'. Essentially, Carina is a term of endearment that is used to say something or someone is cute or a little cutie. OK, so we're not here for an Italian lesson and you're still wondering where this is going.
Believe it or not 'Carina' is the Latin word for Keel ! It is also the origin of the word "Careen" which means to put a ship or boat on her side for maintenance. The Pirates would do this in secluded coves across the Caribbean because there were no dry docks available. They would careen their ships at low tide to clean and repair the hull and keel.
Being enlightened with this bit of knowledge, I realized that it served absolutely no purpose in the task I had ahead of me. Specifically, removing and repairing a 475 lb. piece of cast iron. It is a fun fact though, so in a useless sort of way I guess it serves some purpose. Especially, if anyone with the name Carina happens across this blog... I'm curious to know if they realize they were named after a boat part.
It is a spectacular boat part though! The most important one in fact!
The keel of a ship is often referred to as the spine and provides the structural integrity needed to endure the forceful movement and pounding of ocean waves. It is the lowest beam that runs down the center, from bow to stern to which all of the hull's ribs are connected.
On a sailboat however, there is yet another keel. It is a lateral appendage that extends downward from the bottom of the hull and is normally shaped like a 'fish-fin' or an 'airplane wing'. Much like the name Carina, there are many variations of keels. The main two are normally referred to as being fixed or swing. A fixed keel is constructed as part of the hull and does not move. A swing keel however, can move up and down by way of a mechanical crank and cable system. This is normally found on smaller inshore or lake boats and it comes in handy when navigating shallow water.
Now, me being the kind of guy who is always looking for ways to streamline a process (take a shortcut), my initial thought was -if the boat was already constructed with the first keel, why do I need a second. Maybe I could just disconnect this hunk of rusty metal and toss it. Nope.... tossing the keel is probably not the best idea and I'll tell you why.
That hunk of rusty metal is actually going to keep the sailboat in the upright position when the wind is attempting to push the boat over on its side. (See figure 1)
Additionally, the shape of that hunk of rusty metal (after I fix it of course) is going to convert the sideways forces of wind and water into forward momentum which will ultimately get me from point A to Point B. (See figure 2)
----------------------------------------------------------------------------------------------------------------------------

Figure 1- A is the center of buoyancy and G is the center of gravity. So the weight of the keel will always be pulling straight down (gravity right?) when the boat is tilting to one side or the other. This will help right the boat.

Figure 2- If you would like to learn more on how this works research Bernoulli's principle.
--------------------------------------------------------------------------------------------------------------------------
So you see my friends, I have learned that the keel is a very important part of a sailboat! If properly maintained, It will ensure the safe and efficient operation of your vessel for years to come. Keep in mind that the key take-away here is "properly maintained"...
In other words, don't let this happen to you...

As you can see in the photo above, the keel is heavily corroded and pitted- a direct result from years of neglect. The previous owner allowed the protective coating to wear away, ultimately subjecting the bare metal to the elements. An annual coat of paint would have prevented this but maybe they didn't paint it because they didn't know how to put the boat up on blocks. No problem, I know how to block a boat now so it's time to roll my sleeves up and bring this keel back to life !

Here you can see that I started lowering the aft end of the keel. My plan was to get an automotive floor jack under the forward end of the keel to secure it in place. Once secure, I would jump into the boat and disconnect the bolt that held it place, then jump out of the boat and lower the jack so that the keel would come to rest in a cradle that I constructed from some wood I had laying around.

Before I started this task, I did in fact do quite a bit more research than the etymology of the word keel. The funny thing about this particular task is that every 'You Tube' video or picture blog (at least the only ones I could find anyway) only showed the -before and after- shots of the actual removal process. In other words, I would click on a 'How to Remove a Keel' video and it would show how they raised the boat, lowered one end of the keel, and then the next video shot was the keel sitting on the ground.
I kept asking myself, where's the, "how you remove the keel" part? That's what I really needed to see!
I now know why the cameras were put away during the actual disconnection steps. This is actually a very dangerous operation and it requires your full attention without the distraction of taking a selfie to show your friends that you are laying on your back under 1600 lbs of boat and iron!
My "Jump in the boat-Jump out of the boat" plan never came to fruition. I was able to get as far as jumping into the boat -to remove the nut from the bolt- but that's as far as I got.
I would like to say that the bolt was simply rusted in place but it was not that simple. After many failed attempts of applying lubricant, penetrant, a 4lb hammer coupled with a variety of punches and a few choice words... I realized that this bolt wasn't going to budge!

Yes I used that big aluminum bar too!
If you're not familiar with the term dissimilar metal corrosion, try to think of the Chinese Zodiac. You know what I'm talking about... those cool place mats you find at the Chinese restaurant that list the compatibility of all the Zodiac animals. Well, let's assume for a moment that you are the Sheep. The little chart tells you that you are compatible with the Rabbit but never the Dragon. That's what happens with dissimilar metal corrosion. In this case the keel (iron) is the Sheep and the bolt (stainless steel) is the Dragon.
Dissimilar metal corrosion occurs when the properties of two different types of metal come into contact and chemically react with each other, resulting in rapid corrosion. The corrosion, if not treated, can become so severe that the two metal objects practically fuse together. This is kind of what I was dealing with here.
I was not very happy about moving on to Plan B but I really didn't have much of a choice. The bolt would have to be cut out from the underside which meant I had to lay under the boat to gain access to the bolt with a reciprocating saw-which creates a tremendous amount of vibration. Not to mention that stainless steel is a very hard metal and extremely difficult to cut. I was about to find out how good my new boat blocking skills really were....


Obviously I am writing about this so I survived the ordeal. I will say however, even though cutting the bolt only took ten minutes it felt like it took a week. The center section of this bolt didn't come out of the keel until two days later. I had to use a heavy duty drill to remove it.
Once the bolt was free I was able to slowly lower the jack and gently drop the keel into the cradle. I was then able to wheel the cradle out from under the boat and use my neighbors engine hoist to lift and set the keel across two blocks.


in the keel.

I had to drill half way through with a carbide drill bit, and then use a punch to finally remove it once and for all.
--------------------------------------------------------------------------------------------------------------------------
So that's that! Now we can get busy and fix the keel. The best way to do this would be to have all of the corrosion sandblasted off before applying the protective coatings that are needed to keep the keel from corroding again. I did not have access to a sandblaster and was not about to load the keel in the back seat of my car and take it to a shop, so I took a different approach.
Remember how we discussed the dissimilar metal effect? The Dragon was bad for the Sheep but the Rabbit was good... Well, I was going to fight fire with fire. Rather than sandblasting the corrosion I decided to treat it with phosphoric acid.
This stuff is the Rabbit to the Sheep....

Phosphoric acid is a mineral acid that is used in a variety of applications. One such application just so happens to be rust conversion. Yet, another chemical reaction just as we noted in dissimilar metals but now it would be a chemical reaction in my favor. The acid doesn't actually remove the rust it essentially converts it. Phosphoric acid turns iron oxide (rust) into iron phosphate (iron) so you then have a stable surface to apply a protective coating. This is old school stuff but it works! Anyone remember naval jelly? Same thing....


It was raining pretty hard the day I did this epoxy application so I had to work indoors. Of course I had to figure out a way to protect the garage floor and needless to say I was successful. I suppose I was also feeling a bit creative hence, the smiley face. The pitting was still evident so I had to continue to fill and fair.....
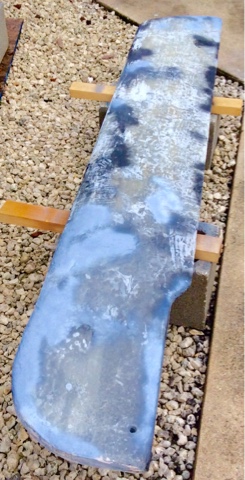
Now we're making some progress! High spots are marked in light gray, low spots in black.
I should probably figure out a way to protect the rocks like I did the garage floor... ;)

And there's my little Carina!
Nice commentary on the process. I am glad my keel is fixed. Although, if repair is ever needed I'll be working on my back.
ReplyDeleteHi, Thanks for the compliment! If you ever have to work on yours let me know... If I can't help I'll at least cross my fingers for you... Lol
DeleteThanks again!
The Curious Sailor
Wow, you are really doing it right Vinnie! Loved the smiley face and you did a great job leading us thru the process. Wish I was there for the Bolt Removal... LOL.. bet that was a JOY. ;) Your Carina looks Awesome, love her new color - you did a great job! Way to go
ReplyDeleteThanks Diane! Trust me you didn't want to be there for the bolt removal, unless you were covering your ears... Lol !
DeleteLooks good. My 1974 V21 keel has only a steel core with a lead bulb in the end 16" or so (aft end when retracted and low end when hanging in the down position). The core is supplemented with a filler material and then everything was covered in polyester, glass mat and epoxy filler to fare out the transitions in contours. From the link below, you will see what remains after all the rusted core was removed along with delaminated glass/filler material.
DeleteBTW, my keel would not drop from the trunk due to the expansion of the rust from the core that caused the delamination. I hadnto insert a block in the shallow part of the trunk as I raised the aft end of the keel with its winch. Also, instead of a jack below the keel, I wrapped a web strap come-along over the cabin at the mast step and then under the keel about at the pivot bolt point. I lowered that end by backing down the strap as the winching levered it out of the trunk. Once free, I dropped the aft end onto a support dolly and then lowered the pivot end. I was able to roll it out and then use a cable come-along supported by a 3" square steel tube (actually, a trailer tongue) that was supported by bolting to my carport posts. I may have to start my own blog site to fully explain it all...
Now on to repairing and rebuilding!
Thanks for the process post and pictures.
(Questions to ebachy@gmail.com)
Cheers!
Does cara also mean costly?
ReplyDeleteKr josef
Hi Kr josef, thanks for the comment...
DeleteAs I understand the Italian translation, Cara means love or beloved. So yes depending on who one's "Cara" is, yes- it could be costly.... Lol.
Thanks for this Post! I'm embarking on the keel bolt removal on my V17 in the next month or so. I couldn't budge the bolt last year and having exhausted my budget on other projects just sailed her as/is. I hadn't thought of the sawzall option. I was going to use an air hammer but this looks easier and less hazardous to the fiberglass centerboard case. I'll post updates on the venture forum when I get to it. Thanks again.
ReplyDeleteAwesome Steven! Thanks for the feedback! Try to remember to keep the keel wedged in the trunk at all times and to use extra blocking to support the underside of the boat. If you hit a snag at anytime and need additional info feel free to contact me anytime. Cursailor@gmail.com
DeleteGood Luck!
So? That's it?
ReplyDeletekr
Josef
Hi VentureED and welcome aboard... Sounds like we had a similar keel experience. It's definitely not the easiest job in the world but it feels great once completed. How far off is your restoration? I'm getting close....
ReplyDeleteYou should start a blog! The experience is that much better when shared...
Keep up the good work..
Curious Sailor